This article explains how to manage common Outlook message options and preferences, including adding a mobile signature and requesting read or delivery receipts.
Before you begin: Outlook options may vary depending on whether you are using Outlook on the web, classic Outlook for Windows, new Outlook for Windows, Outlook for Mac, or the Outlook mobile app.
Add or Change a Signature in the Outlook Mobile App ▾
Use these steps to add or update the email signature used by the Outlook mobile app on your device.
- Open the Outlook app on your mobile device.
- Tap the Outlook icon, profile icon, or initials icon to open the app menu.

- Tap the Settings gear icon.

- Under Mail, tap Signature.
- If you have more than one account in Outlook, choose the account you want to update or enable the option to use a signature per account, if available.

- Enter the text and links you want to use as your signature.
- Tap Done or save the signature, depending on your device.

Note: Signatures are app-specific. A signature created in Outlook mobile may not be the same as the signature used in Outlook on the web or Outlook desktop.
Add or Change a Signature in Outlook on the Web ▾
Use these steps to create or update a signature in Outlook on the web.
- Go to https://outlook.office.com.
- Sign in with your full FAU email address and FAU password.
- Select Settings, usually shown as a gear icon.
- Select Mail.
- Select Compose and reply.
- Create or edit your signature.
- Choose whether to automatically include the signature on new messages, replies, and forwards.
- Select Save.
Read Receipts and Delivery Receipts Overview ▾
Outlook allows you to request delivery receipts and read receipts for messages. These options can help confirm whether a message was delivered or opened, but they are not guaranteed.
- Delivery receipt: Confirms that the message was delivered to the recipient’s mailbox or email server. It does not confirm that the recipient opened or read the message.
- Read receipt: Requests confirmation that the recipient opened the message.
Important: A recipient can decline to send a read receipt. Read receipts may also not be sent if the recipient’s email system does not support them or if the organization blocks them.
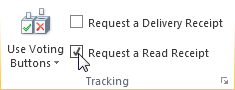
Request a Receipt for One Message in Classic Outlook for Windows ▾
Use these steps to request a read receipt or delivery receipt for a single email message in classic Outlook for Windows.
- Open classic Outlook.
- Create a new email message.
- Select the Options tab.
- In the Tracking group, select Request a Delivery Receipt, Request a Read Receipt, or both.
- Compose your email and select Send.
Request Receipts for All Messages in Classic Outlook for Windows ▾
Use these steps if you want classic Outlook for Windows to request receipts for every message you send.
- Open classic Outlook.
- Select File.
- Select Options.
- Select Mail.
- Scroll to the Tracking section.
- Select Delivery receipt confirming the message was delivered to the recipient’s email server, Read receipt confirming the recipient viewed the message, or both.
- Select OK to apply your changes.
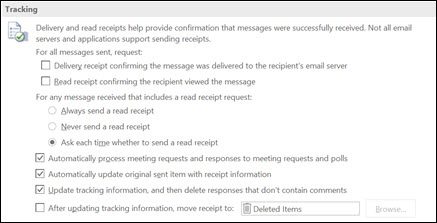
Note: Requesting receipts for all messages can create additional email notifications. Use this setting only if you need receipts regularly.
Request a Receipt in Outlook on the Web or New Outlook ▾
Use these steps to request a read receipt or delivery receipt when composing a message in Outlook on the web or new Outlook.
- Open Outlook on the web or new Outlook.
- Create a new email message.
- Select Options or Message from the compose ribbon.
- If you do not see receipt options, select More options from the ribbon.
- Select Request a read receipt, Request a delivery receipt, or both.
- Compose your email and select Send.
Note: Button names and ribbon layout may vary slightly depending on your Outlook version and window size.
Request a Receipt in Outlook for Mac ▾
Use these steps to request a receipt in Outlook for Mac.
- Open Outlook for Mac.
- Create a new email message.
- Select Options, Receipts, or Request Receipts, depending on your Outlook version.
- Select Request a Read Receipt, Request a Delivery Receipt, or both.
- Compose your email and select Send.
Track Receipt Responses ▾
Receipt responses are usually delivered to your Inbox. In classic Outlook for Windows, you may also be able to view tracking information from the original sent message.
- Open Sent Items.
- Open the original message that requested a read or delivery receipt.
- Select the Message tab.
- In the Show group, select Tracking, if available.
Note: The Tracking option may only appear after Outlook receives receipt responses.
Troubleshooting ▾
- If your mobile signature does not appear, confirm that you updated the signature in the Outlook app on that specific device.
- If you use multiple Outlook apps, check the signature settings in each app separately.
- If receipt options are missing, confirm which Outlook version you are using and check the message ribbon for Options, Message, or More options.
- If a read receipt is not returned, the recipient may have declined the request or their email system may not support read receipts.
- If a delivery receipt is not returned, the recipient’s email system may not send delivery confirmations.
Still Need Help?
If you need help with Outlook signatures, read receipts, delivery receipts, or message options, please contact the Help Desk at 561-297-3999 for assistance.