This article provides a quick reference for navigating common areas in Windows 11, including the Start menu, File Explorer, Settings, Quick Settings, and Snap Layouts.
Before you begin: Windows 11 may look different from previous versions of Windows. Use the sections below to find common tools, settings, and navigation areas.
Start Menu ▾
The Windows 11 Start menu is used to open apps, search for files or settings, access recommended items, and restart or shut down the computer.
- Select the Start button on the taskbar, or press the Windows key on the keyboard.
- Use the Search field at the top of the Start menu to search for apps, files, settings, or other items.
- Select All apps to view the full list of installed applications.
- Use the Pinned section to access commonly used apps.
- Use the Recommended section to access recently opened files or apps.
- Select the user icon to access account-related options.
- Select the Power button to sleep, shut down, or restart the computer.

Note: Windows 11 Start menu may look different depending on the update version or user customization.
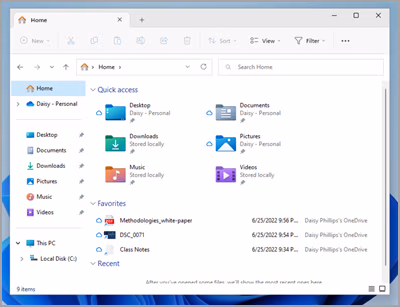
File Explorer ▾
File Explorer is used to browse files, folders, OneDrive, This PC, shared locations, and network drives.
- Open File Explorer from the taskbar, Start menu, or by pressing Windows key + E.
- Use the Navigation Pane on the left to access common locations such as Desktop, Downloads, Documents, OneDrive, This PC, and Network.
- Use the New button to create a new folder or file.
- Use the toolbar at the top for common actions such as copy, paste, rename, share, delete, sort, and view options.
- Select the three dots menu for additional options.
- Use the address bar to see or change the current folder path.
- Use the search box to search within the current folder or location.
Settings ▾
The Settings app is used to manage Windows options such as network, display, sound, updates, accounts, accessibility, and personalization.
- Open Settings from the Start menu, or press Windows key + I.
- Use the Search field at the top left of Settings to quickly find a setting.
- Use the categories in the left pane to browse settings by area.
- Select a category to view additional options and subcategories.
Common Settings categories include:
- System: Display, sound, notifications, storage, and power settings.
- Bluetooth & devices: Printers, scanners, mouse, keyboard, and connected devices.
- Network & internet: Wi-Fi, Ethernet, VPN, and network settings.
- Accounts: Sign-in options and work or school account settings.
- Windows Update: System updates and optional updates.

Quick Settings ▾
Quick Settings provides fast access to commonly used controls such as Wi-Fi, Bluetooth, volume, brightness, accessibility options, and airplane mode.
- Select the network, volume, or battery area in the bottom-right corner of the taskbar.
- Use the available buttons to turn features on or off, such as Wi-Fi, Bluetooth, Airplane mode, or Accessibility.
- Use the sliders to adjust volume or brightness, if available.
- Select the pencil/edit option, if available, to customize which Quick Settings buttons appear.
- Select an empty area outside the Quick Settings panel to close it.

Snap Layouts ▾
Snap Layouts help organize multiple open windows on the screen. This can make it easier to work with more than one app at the same time.
- Open the windows or applications you want to arrange.
- Hover your mouse over the Maximize (square) button in the top-right corner of a window.
- Select one of the available Snap Layout options.
- Select a region in the layout to place the current window.
- Select additional windows when prompted to fill the remaining sections of the layout.
- To return to a group of snapped windows, hover over the app icon on the taskbar and select the Snap group.

Tip: You can also use keyboard shortcuts such as Windows key + Left Arrow or Windows key + Right Arrow to snap windows.
Troubleshooting ▾
- If you cannot find an app, open the Start menu and use the Search field.
- If you cannot find a setting, open Settings and use the Search field.
- If Quick Settings does not open, restart the computer and try again.
- If File Explorer is not responding, restart the computer.
- If a Windows feature looks different than expected, your device may have a different Windows 11 version.
Still Need Help?
If you need help navigating Windows 11 or locating a specific setting, please contact the Help Desk at 561-297-3999 for assistance.